Deck.Blue is an app you can opt to connect to your Bluesky account that enables you to view posts in a multi-column layout. It is refeshingly very similar to Tweetdeck (which was initially a free app you could connect with Twitter, but made a paid pro feature by X).
You can view a home column (all posts), your posts, your notifications; and also choose to create additional columns that can curate posts from a list you have created or followed, or a specific search or hashtag.
Using Deck Blue
To use Deck Blue you will need to connect your Bluesky account. Go to deck.blue and then log in using your Bluesky username and password.
How to create a new column
To create a new column click on the + sign. You can then choose what you would like to see in that column. Click on Search if you want to add a specific account or hashtag.
Column settings
To access column settings click on the cog icon at the top.
Here you can see < > which enable you to change the order of the columns. Click on one of the arrows to move a column to the left or right. You can also choose to edit the size and width of columns and how frequently you want posts to refresh.
Optional notification sound alerts
If you enable notifications sound you can choose from a collection of sounds including a cat purring! I wouldn’t recomment to opt to have the post alert on your Home column as it would be ‘pinging’ constantly, but it is a fun alert to let you know if anyone has interacted with a post you have created.
In case you didn't know: back in September, the first notification sound I added to deck.blue is my wife's cat meowing (reversed) because it sounded like the old TweetDeck notification sound
Click on the blue icon in the top left corner. This opens a text box where you have a maximum of 300 characters. You can also add hashtags, images, GIFS and edit settings to choose who can respond to the post.
Scheduling is currently a paid membership feature due to the persoanl high costs to run this. But the creator says on his Patreon page “If Bluesky ever offers a free scheduling API, I’ll change to that as soon as I can and disable my paid feature (unless mine has more features, then it’ll still have a reason for it to exist separately).”
Other dashboards
There are also other Bluesky projects such as Skyfeed, Tokimeki and Skeetdeck which offer similar features.
Buffer
Bluesky has also partnered with Buffer. This offers a free option to connect up to three channels. These include Instagram, Facebook, LinkedIn, YouTube, Mastodon, Threads, Pinterest and TikTok.
Buffer is a a social media toolkit with scheduling and cross-posting features. The scheduling feature, you can plan and organise your Bluesky posts alongside your other social media content. This means you can write a post and choose a time and date for this to post and it will release this at that scheulrd time.
I joined Bluesky on May 2 2023 after what seemed a long time on the wait list. Once I was in I began to receive between 3-5 invite codes I was able to forward to friends and colleagues. I was keen to encourage those on Twitter I was connected to and considered part of my valued network to create an account on Bluesky.
Over the last year I have seen a gently influx of people I know joining Bluesky but myself including the post and interactions have been minimal. Last month Jisc and ALT made an anouncement they were leaving Twitter (or at least no longer posting there). It was from this point that traffic increased and I started to re(connect) with those who had either ledt Twitter or stopped tweeting.
For many I sensed that due to the goings on in the other space, some had gone on to try other social networks such as Mastoden or Threads, were possible also trying to interact in LinkedIn and overall were feeling overloaded. The thought of joining another space was too much.
According to the July 2024 Datareportal report the average number of social media platforms that internt uses use actively each month rises from 5.1 for ages 55-64 to 7.4 ages 16-24.
On September 12 2023 Bluesky reached 1 million users. As of March 2024, Bluesky had over 5.2 million users.
Bluesky @bsky.app last week announced they now had 10 million users. They created a link to download a badge dentifying the date you joined and where you were in the lineup of followers.
My Bluesky badge shows that I currently stand in the first 1% and designted as a Certified Bluesky Elder.
If you would like to connect with me on Bluesky you can find my profile here: @suebecks.bsky.social
Bluesky now has over 10 million users, and I was #53,362!
The Digital 2024 July Global Statshot Report identifies the primary reasons why social media users use social media. One of the key irritations when using social media (aside from what is shared by some) is what content is being shown to you due to the algorithmic manipulation of people’s timelines. People want to see posts from friends and in the order they are posted.
Datareportal (2024, page 267)
Bluesky’s vision is this:
We want a future where you control what you see on social media. We aim to replace the conventional “master algorithm,” controlled by a single company, with an open and diverse “marketplace of algorithms.”
You have three standard feeds to follow: Following, Discover and Popular with friends. Discover mixes in a global view of what’s trending in the network with posts from accounts you follow and posts from accounts near your social graph.
You then choose to create or follow Lists or follow a Custom feed (currently this needs developer experience to create). Features on Bluesky are contiually being developed.
Bluesky is a social networking app that is very similar to Twitter. It launched publicly in 2023 but potential users had to initially join a waitlist for an invite code. Now anyone can join. The number of users is growing daily!
You can download the Bluesky app for iOS or Google Play, or use Bluesky via desktop.
Creating an account
You can create an account at bsky.app. Click on the Sign Up button at the top left. Then add your name, chosen handle (username), email address and create a password. You will then be prompted to add a profile picture, bio and other basic information
You can change the display settings to be light or dark mode, or to match your system settings, via Settings > Appearance.
Your profile
Username and profile picture
Users create a handle which is then represented as @username.bsky.social. You can choose to upload a photo or avatar. It can be helpful to use the same profile picture and username as other social media accounts as this will help others recognise you. There is also the option to add a header image.
Bio
When writing your bio, tell people who you are, what you do and an indication of your interests. You can also add links to other social media accounts and websites. This helps people make a decision whether to follow you or not. Accounts with both a photo and bio are far more likely to be trusted.
Building a network
You can use Search to find people by their name or handle. Once you identify people of interest you can then follow them. A helpful next step is to look at who they follow and who their followers are. You can then see if there are people you would like to follow. As soon as you follow an account, the user will get a notification. They can then opt to check out your profile and choose to follow you back.
From the Home screen you can also click on Discover to find popular posts and potential accounts to follow. Popular with Friends shows you posts thar are popular with accounts you have followed. Again periodically check who your friends are following to see if there are new connections to make.
You may see friends share a Starter Pack. Users can create these to recommend accounts to follow. This collection (of up to 150 accounts) can be given a name and then shared as a link or QR code. When you click on this, it reveals a list of accounts you can then choose to follow. It’s a great way to start building your network. (See below for more info on creating your own starter pack).
This is an example of a Starter Pack I created containing educators in higher education that have a Bluesky account: Educators in HE Starter Pack 1.
Posts
This will be familiar if you have used other social networks. Click on New Post and then type your message in the space where it prompts you with ‘What’s up?’. You have up to 300 characters of text and can add images, video, GIFs or emojis by clicking on the relevant button. Hashtags and URL links can also be added to the post.
For your first post start with an introduction. Let people know you have joined! Then engage with posts you find interesting that others have added by liking, resharing and/or commenting.
Direct Messages
These are private one-to-one messages directly within the Bluesky app. By default, your permissions allow anyone you follow to DM you. You can change these settings to allow no one or anyone to message you.
To send a direct message
Click the Chat icon. On mobile, you can find the icon at the bottom of your screen. On desktop, this is a chat bubble on the side bar (or go to https://bsky.app/messages).
On mobile, click the plus icon to start a new conversation. On desktop, click “New chat” in the top right to start a new conversation. Search for the user you want to message.
Write your message, and hit send.
If the app says a user cannot be messaged, they may have set their account to only allow messages from people they follow or from no one.
Lists
Lists are a collection of users. You don’t need to follow an account to add a user to a list.
You can create a User List by clicking on Lists in the left menu and then + New. These are public and shareable. You have the option to add a List Avatar, a List Name and Description.
To add people to your List, click on their profile and then the three dots. From here click Add to Lists and select the List you wish to add them to.
A starter pack is also a collection of users, but provides an easy way to share your favourite feeds and people with friends as it gives the option for others to Follow All or individual accounts directly from the list. This a helpful start for those new to Bluesky. Every starter pack comes with a link and QR code that you can share with your professional network or post on other social apps.
Anyone with a Bluesky account can create starter packs. You can choose to use the auto-generation tool to create a starter pack or make your own from scratch. You can create more than one starter pack.
Click the Starter Packs tab which you can find on your profile, next to your media and likes tabs. Then click Create to add users to your starter pack.
To mute or block and account click on their profile and then the three dots on the top right. Click either Block Account or Mute Account.
Muting
Muting prevents you from seeing any notifications or top-level posts from an account. If they reply to a thread, you’ll see a section that says “Post from an account you muted” with an option to show the post. The account will not know that they have been muted.
Blocking
Blocking prevents interaction. When you block an account, both you and the other account will no longer be able to see or interact with each other’s posts.
How to flag abuse?
You can report posts by clicking on the three-dot menu. You can also report an entire account by visiting their profile and clicking the three-dot menu there.
If you would like to connect with me on Bluesky you can find my profile here: @suebecks.bsky.social
This is an updated post originally written in 2020.New podcasts have been added to the list. If you have a podcast favourite or host one of your own that relates to higher education please contact me and I will add you to the list.
What is a podcast
A podcast is an audio programme that can be listened to on your computer, smartphone and other mobile devices. Podcast is a portmanteau, a combination of ‘iPod’ and ‘broadcast’. POD is also described as ‘portable on demand’ (Wikipedia). Typically a podcast features one or more hosts who engage in a discussion with each other or guests on their show.
How to listen to a podcast
You can listen to a podcast via your computer via the site they have been created on. To ensure you get reminded about new episodes you can subscribe to podcasts on your computer using Feedly or iTunes.
However the added value of listening to audio is being able to listen wherever you are, be that commuting to work, talking a run, or walking the dog. Both Apple and Android have built in podcast apps, which means you can listen to the podcasts on your smartphone. There are also other apps such as Mixcloud, Player FM, Podbean, Spotify, Audioboom which you can use.
I have an iPhone so went for the iTunes option. The quickest way I’ve found to add podcasts was to google the podcast show (on my phone or laptop) and select the link for podcasts.apple.com. Then simply click subscribe. The podcasts can then be accessed via the Apple podcast app on my phone or iTunes on my laptop.
My collection of podcasts relating to higher education, edtech and coaching
One of my earliest experiences of listening in to a podcast led by educators was Break Drink, led by Laura Pasquini and Jeff Jackson back in 2011. They describe BreakDrink as “An occasional chat with Jeff Jackson and Laura Pasquini about life, work, and random stuff. There’s a good chance you’ll hear these co-hosts talk about their thoughts on current events, ukuleles, the NBA, podcasts, higher ed, rescue dogs, research, books, technology, and tacos… not in any particular order.” I really enjoyed the banter chat that goes on. Laura has gone on to host other podcasts as you will see below.
These are a selection of the podcasts I can recommend:
If you are interested in exploring how to create your own podcast Andy Tattersall has created an online course that teaches you everything you need to plan, record and produce your own academic podcast. He focuses on using free and low cost tools and giving learners the hands-on skills to do things for themselves. https://andy-s-school-aeae.thinkific.com/courses/academicpodcast
xSince the emergence of social media in the early 2000’s, innovative educators have sought ways to utilise, adapt, and maximise the opportunities for learning within social networking and collaborative online spaces. My colleague and fellow researcher of social media
The purpose of this systematic review was to analyse the work published on social media for learning in the Journal of University Teaching and Learning Practice (JUTLP) over the 20-year life of the journal to date. We summarised the current evidence on the use of social media for learning and documented how the field has evolved and changed since its emergence as a pedagogical theme. We explored themes for the use of social media for learning, key challenges, how the use of social media has changed over time, and we looked at specific types of papers that contribute to the original research on social media for learning.
We achieved this through a systematic review 3-step process: 1) scoping and understanding the review context and research questions, 2) undertaking methods using an established approach for a systematic and quality assessment of the literature, and 3) undertaking a thorough thematic analysis of the empirical evidence from the systematic review papers to provide meaningful outcomes and recommendations. This robust approach resulted in the analysis of 11 papers and exploration of 4 key themes: Computer mediated communication, digital capabilities, and confidence, learning community, and social media pedagogy. Finally, we made recommendations that aim to benefit both editors and authors of JUTLP, and editors and authors more generally.
Within this paper we created a taxonomy of social media platforms for learning in higher education. We took this information and created a visual inforgraphic. The full paper is open access and a link to the paper and a further infographic capturing a timeline of socila media communication platforms can be found at the end of this post.
Taxonomy of Social media Platforms for Learning in Higher Education (Purvis and Beckingham, 2024)
References
Purvis, A. and Beckingham, A. (2024) A Decade of Social Media for Learning: A Systematic Review. Journal of University Teaching and Learning Practice, 21(5) https://doi.org/10.53761/vvvccy83
You can add a description, sometimes called alt-text, to your photos so they’re accessible to even more people, including people who are blind or have low vision. Good descriptions are concise, but present what’s in your photos accurately enough to understand their context. For anyone using a screen reader this will read the Tweet text and the alternative text you provided for your image. The same concept applies to adding images to other social media, blog posts and websites.
On your phone when you add an image you will see a paint brush icon. Click this and it takes you to the ‘Edit photo‘ page. Here you can select the ALT option. This stands for alternative text. You have up to 1000 characters to describe your image. Then tap Done and then Save. This will take you back to your tweet which you can then finalise and send.
From twitter.com, once you add an image you will see ‘Add description‘ underneath it. Click this and add your description. Then click Save. This will take you back to your tweet which you can then finalise and send.
Description tips
You don't necessarily need to say "image of" in your alt text for users to know it's an image. Screen readers will announce that it's an image. But it can help readers to specify if it's a hand-drawn image, Polaroid, infographic, screenshot, chart, map, diagram, or so on.
— Accessibility Awareness (@A11yAwareness) July 28, 2022
It should not come as a big surprise that employers and recruiters will look at your LinkedIn profile. They are just as keen to fill open posts as you are securing a job. One way they can do this is by using LinkedIn to search for keywords that relate to the job(s) they have open. If this brings up your profile, then they could choose to contact you if they felt your profile matched what they were looking for.
A second way is when they have received your application, CV and cover letter, they search for your profile using your name. Taking a look at your LinkedIn profile can provide them with a check that what is on your CV matches what is on your public profile.
Should you have an incomplete profile, and worse one that has not been proofread and is littered with typos; then this could be the very reason you are not getting a reply from the organisations you are applying to. Below you will find a list of tips on how to make some simple changes to improve your profile.
Headline
This appears under your name. Use this to say what you do (name of your course) and what you want to do (get a placement/graduate role in…). Your headline is likely to be the first thing a recruiter or employer will see.
Photo
Make sure you have a professional looking ‘head and shoulders’ photo. This can be easily taken by a friend against a white or light coloured wall. Make sure you are dressed smartly and you smile. Don’t be tempted to use a cropped version of your favourite holiday photo!
Summary
This section is your opportunity to share your experience (at university, part-time work or volunteering), the skills you have developed and what your career aspirations are. Tell your story! What projects have you worked on, are you a member of a club, society or do you engage in other extracurricular activities? What skills have you gained through working on university projects?
When writing this you may identify there is a gap in your experience. Take the opportunity to fix this by looking for volunteering or paid part-time roles. This could be becoming a Course Rep, Student Ambassador, joining a Society or taking a part-time job.
Imagine this is your elevator pitch with your future employer – you have literally a few minutes to tell them about yourself. Write your summary in first person. Use the STAR technique (Situation, Task, Action, Result) to share real examples to demonstrate your skills and attributes. In short say what the situation was, explain the task and what the goal was, what action did you take to achieve this, and what was the result of the action.
State here that you are open for placement or graduate opportunities, and that you are happy to be contacted.
Skills
Adding specific skills to your LinkedIn profile allows you to showcase your abilities to other LinkedIn members, such as peers, colleagues, managers and prospective employers. Use this section to add both the technical and soft skills you feel you can demonstrate. Be strategic and add the ones you know are relevant to the industry you wish to work in. Over time you will need to revisit this section and add new skills.
Enable the #OpenToWork feature from your LinkedIn profile
This tells recruiters and employers that you are actively looking for work.
To enable the #OpenToWork feature:
Click the Me icon at the top of your LinkedIn homepage.
Click View profile.
Click the Open to button.
Click Finding a new job.
Provide the requested information in the pop-up window that appears. You can choose whether all LinkedIn members or only recruiters can see that you’re open to job opportunities. If you choose to share with all LinkedIn members, LinkedIn will add an #OpenToWork photo frame to your profile photo.
Click Add to profile.
LinkedIn Open to Work feature
Recomendations
If you have work experience, reach out to your colleagues and ask them if they would be happy to give you a recommendation. This is a valuable way to endorse your experience.
Make Connections
This may seem obvious, but over time you should aim to develop your connections beyond those you imediately know and work with. For example you may have attended a Careers Fair at university and talked to an employee representing a company you are interested in working for. You could follow this up by sending a peronalised connection request saying for example “It was good to meet you at the recent Careers event… Thank you for the advice.”
You can also follow Companies on LinkedIn. This will give you updates on information shared by those organisations.
Further information
Visit your university’s Careers and Employability Centre and web page. Sheffield Hallam University is a good example to demonstrate the vast support on offer https://www.shu.ac.uk/careers
Taking the time to keep your LinkedIn profile up to date is without doubt a good investment of time! Ask a friend or family member to read your profile. They can help to pick up any typos you’ve missed and point out anything that perhaps needs to be made clearer.
There may be times when you see content coming up in your feed that you are just not interested in and given the choice you’d prefer not to see! It could be that your timeline is suddenly full of tweets because there is a football cup final going on, it’s Eurovision time or because a new Wordle game gets popular and people like to share their daily results. We all have different interests and that’s fine, but it doesn’t mean you have to see these tweets! If this is happening to you then muting could be the answer!
You can choose to mute Tweets that contain specific words, phrases or hashtags. This is a good solution to remove the tweets twittering about a topic you have no interest in from your feed. Alternatively if it’s a particular person you are following you can opt to mute just their acount. Muting an account is an alternative to unfollowing an acccount or blocking someone. There are good reasons for making these choices, but should you then decide to refollow the account, then they will receive a notification, revealing you had unfollowed them. By muting, the account won’t get a notification. Muting can be done permanantly, until you choose to unmute, or for selected durations of 24 hours, 7 days or 30 days.
A further option is to mute notifications from a conversation you are tagged in. If you are being bombarded with notifications and you have moved on from the original start of the conversation, then it can be helpful to mute the thread.
So in short muting is a useful option to remove tweets from your timeline without unfollowing or blocking anyone. Below you will find how to do this for the different options available.
Mute words and hashtags
Click More from the side navigation menu, then click Settings and privacy.
Click the Privacy and safety tab, then click Mute and block.
Click Muted words.
Click the plus icon.
Enter the word or hashtag you’d like to mute. Entries can only be added one a time.
Select Home timeline if you wish to mute the word or phrase from your Home timeline.
Select Notifications if you wish to mute the word or phrase from your Notifications.
Specify From anyone or From people you don’t follow.
Under Mute timing choose between Forever, 24 hours from now, 7 days from now, or 30 days from now.
Click Save.
Note: Muting words and hashtags only applies to your notifications and Home timeline. You will still see these Tweets via search. Notifications for muted words and hashtags are applied to replies and mentions, including all interactions on those replies and mentions: likes, Retweets, additional replies, and Quote Tweet.
Mute accounts
Mute is a feature that allows you to remove an account’s Tweets from your timeline without unfollowing or blocking that account. Muted accounts will not know that you’ve muted them and you can unmute them at any time. To access a list of accounts you have muted, visit your muted accounts settings on twitter.com or your app settings on Twitter for iOS or Android.
To mute an account from a profile:
Click on a username to open their profile.
Click the more iconnext to the follow button.
Select Mute @account from the dropdown.
To mute an account from a Tweet:
Click the more iconfrom any Tweet.
Select Mute @account from the dropdown menu.
Muting notifications for a conversation
If you would like to stop receiving notifications for a particular conversation, you can choose to mute it. When you mute a conversation, you won’t get any new notifications about that conversation. You will, however, still see Tweets from the conversation in your timeline and when you click into the original Tweet.
To mute a conversation via twitter.com, or from your Twitter for iOS or Android app:
Go to the Tweet detail of any Tweet or a reply in the conversation you wish to mute.
Click the more icon.
Click Mute this conversation.
Click to confirm.
Image credit: Pixabay – Free to use, no attribution required
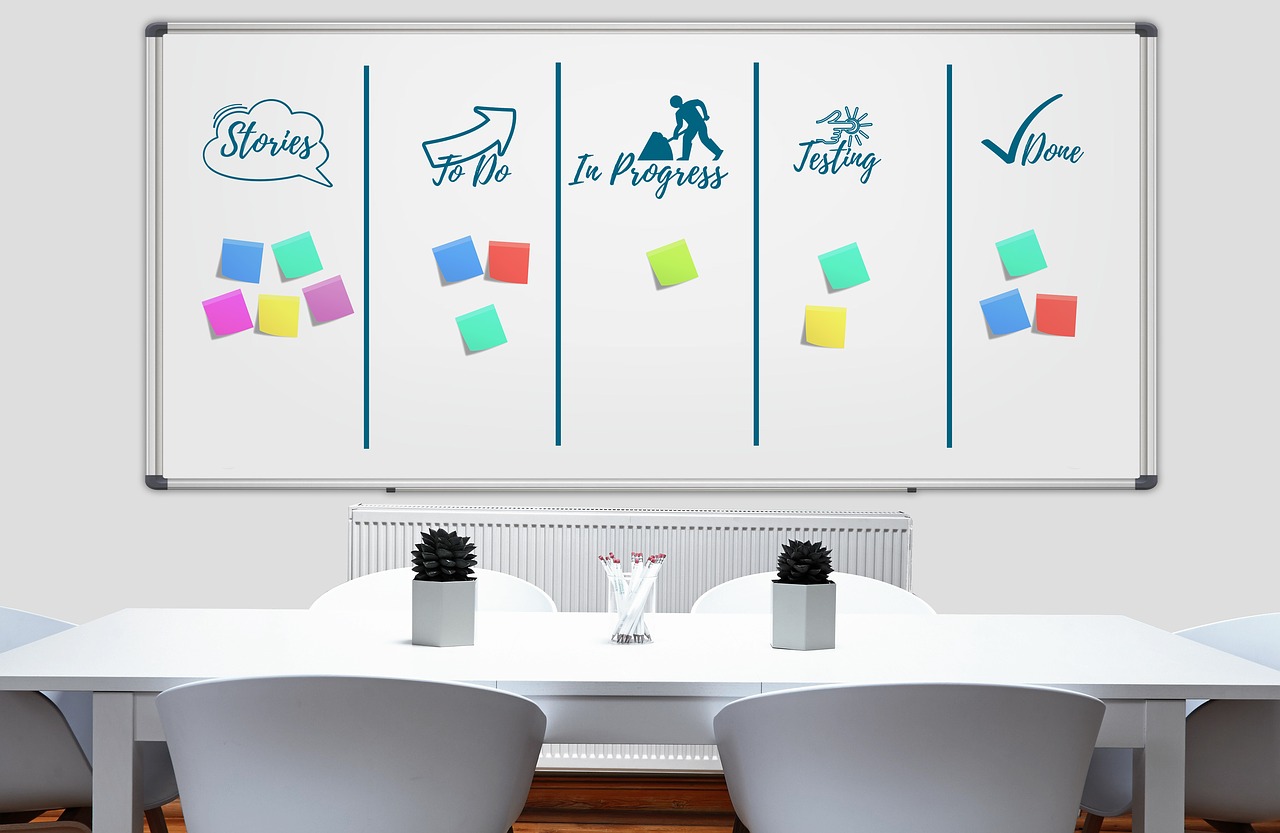
In order for a group project to succeed you need to be organised. It’s important to know what stages make up the workflow that will ensure you complete the project, and who is responsible for what. One approach which has been used by many over the years is KanBan boards. Typically a white board or wall space is used along with some coloured tape to divide the space into columns (progress) and rows or ‘swim lanes’ to seperate individual or teams sharing the same board. Post-its were then used to write individual tasks. These could be moved along as the task progresses.
Kanban board (Pixabay)
A Kanban system is a means of balancing the demand for work to be done with the available capacity to start new work. (Anderson, 2010; Anderson and Carmichael, 2016). A key benefit of this approach is that it can be used with all members of your group project and everyone can see all of the tasks and the progress being made.
“Kanban (かんばん): Visual cards that list details about an item, organized into lists on a board to manage workflow stages.” (Shreiber, 2016)
The example above (Shreiber, 2016) shows the typical kanban headings, creating a To-do list, a Doing list and a Done list. You might choose to head the lists as Today, Tomorrow and This Week or taking writing a blogpost as an example you could have the headings as To Write, Writing, Editing, Publishing, and Promoting.
Ways to use kanban boards
Kanban boards can be used for individual or group projects. These might be one off activities or ongoing work. For example:
Plan personal tasks
Follow progression of meeting actions
Gather ideas for future blog posts
Monitoring the writing, publishing and promoting of blog posts
Track job applications (or applicants if you’re hiring)
Organise a conference
Reading list for a dissertation or paper literature review
Keep on top of assignments
Digital Kanban Boards
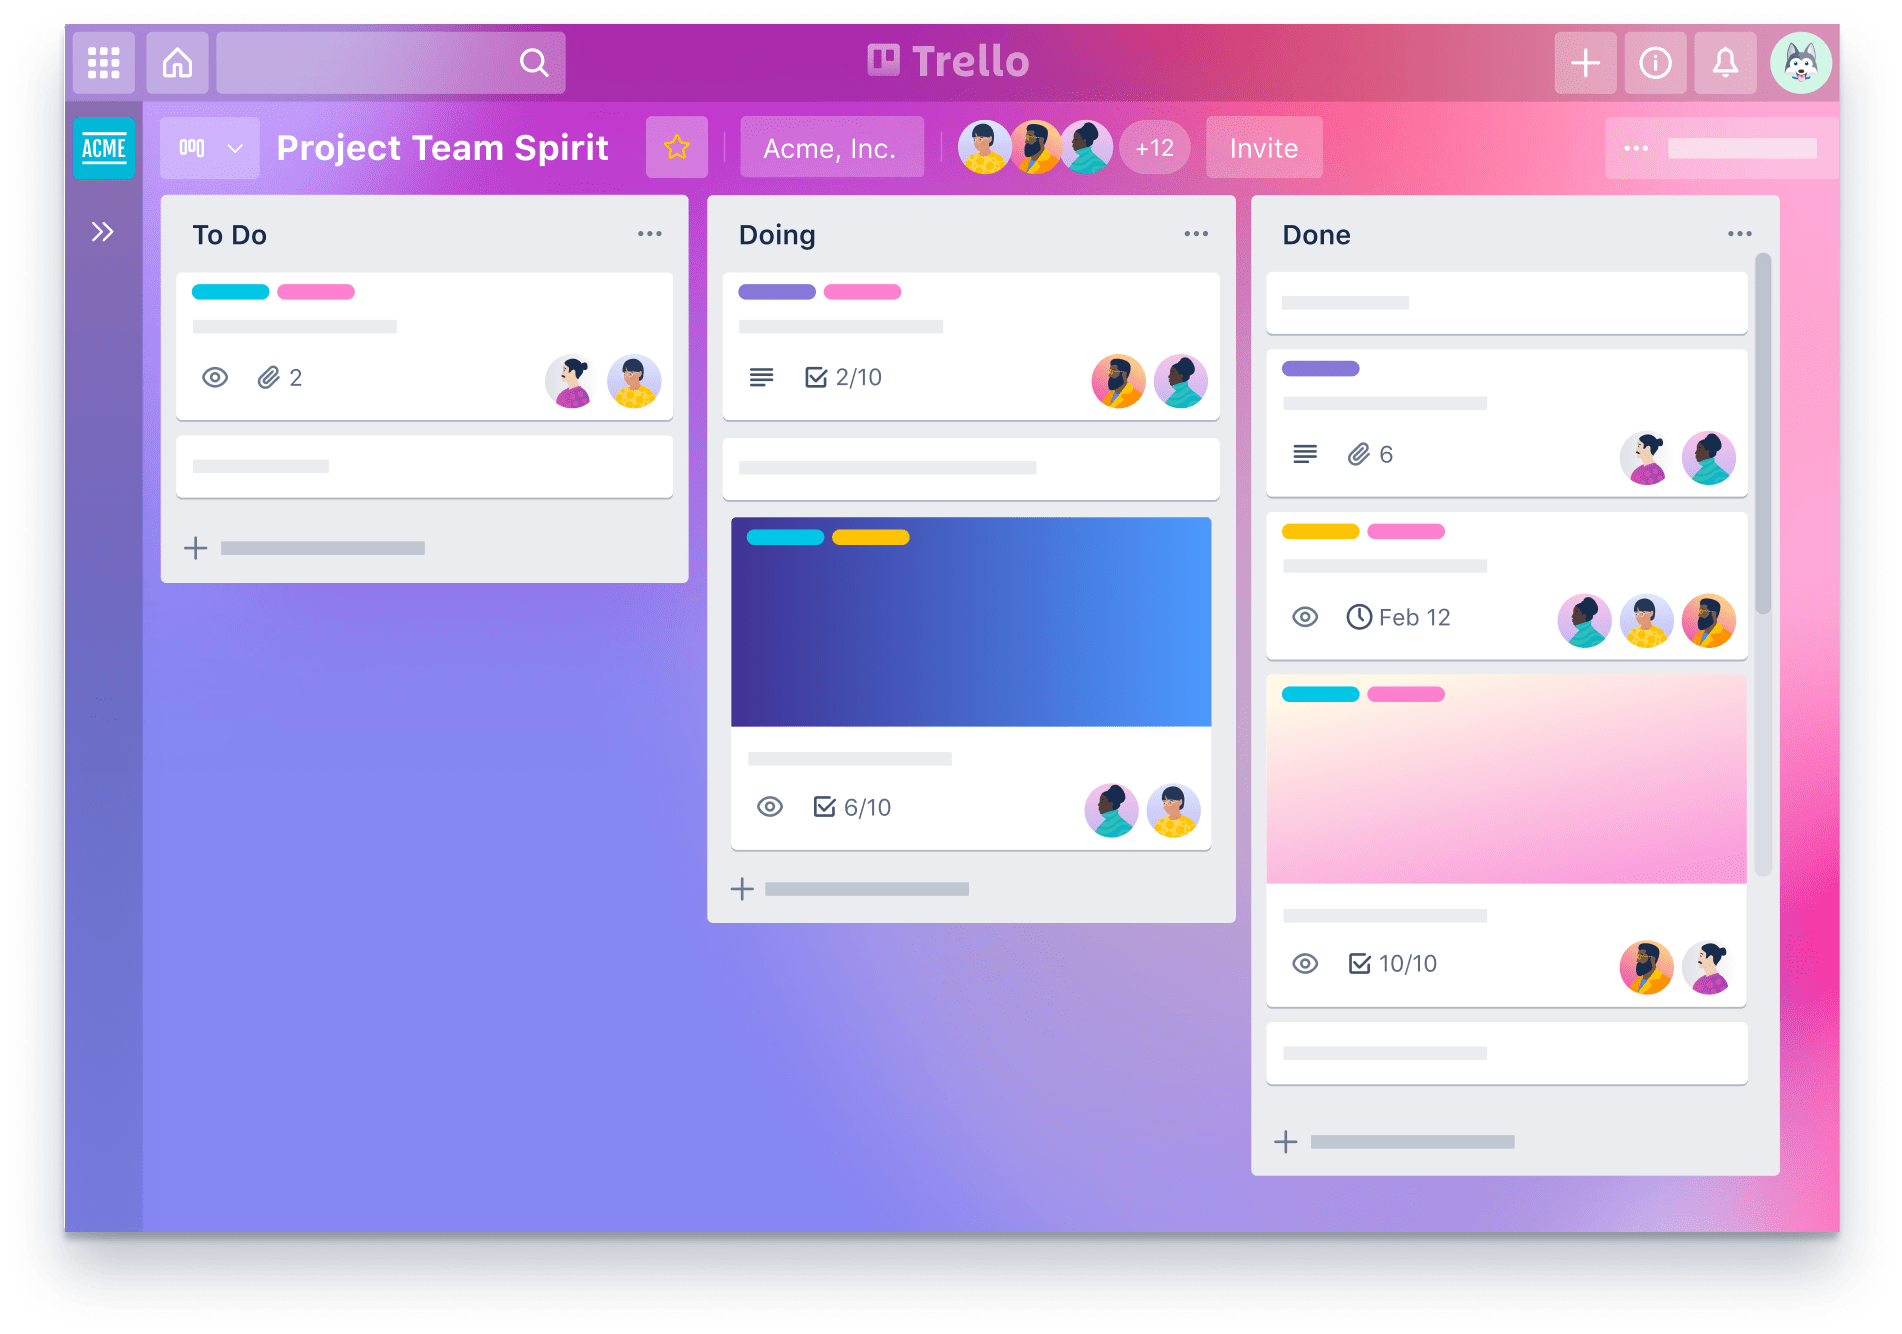
Trello is a useful digital project management tool https://trello.com. The obvious advantage of a digital project management tool is that it can be accessed online, so wherever you are it is possible to work on this. The free version allows unlimited cards and upto 10 boards per workspace. There are iOS and Android mobile apps, and two-step authentication. Added features allow users to:
Assign names to tasks
Leave comments/questions
Add due dates and set reminders
Drag and drop documents onto a card
Trello Board
You may want to explore other options and decide on a space you feel will be most useful for your project.
It has been a long challenging year for all of us and I for one am looking forward to the holidays to spend time with family and friends. What better way to countdown than this selection of bite sized activities created by colleagues to share tips about learning and teaching.
Trent Institute of Learning and Teaching
Using an advent calendar template, each a new door reveals information and tips on ways to help you on your HEA Fellowship journey. Kate Cuthbert and Laura Stinson are reknowned for sharing excellent resources and this festive calendar is no expection!
Follow @NtuTilt and the hashtag #NTUFestiveFellowship for updates.
This group are posting a daily question to talk aboout and share active learning tips. I loved that the questions were croudsourced from the active learning network. Participants are invited to join colleagues in a mini tweetchat at 13:00 GMT to engage in a 15-minute discussion on the benefits of active learning.
Follow @ActiveLearningNTW and the hashtag #ActiveAdvent2021 for updates.
The aim of this blog is to help you explore the different ways you can interact online using social media and the tools to help you do this.
Introducing Social Media
Social Media is an umbrella term for web based and mobile technology that allows the user to produce and share information with others using text and/or media (video, audio, images), who in turn are then able to engage in a interactive dialogue about the content.
About me
Sue is an Associate Professor Learning and Teaching and National Teaching Fellow at Sheffield Hallam University; a Visiting Professor at Arden University and a Visiting Fellow at Edge Hill University. She is also a Principal Fellow of the HEA, a Senior Fellow of the Staff and Educational Development Association, a Certified Management and Business Educator and a Member of the Association of Learning Technology.


 next to the follow button.
 Kanban board (Pixabay)
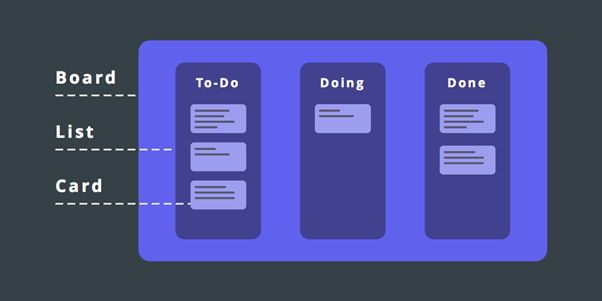
 Trello Board