For those of us of a certain age you may remember the AOL email notification you could opt to turn on.
You ‘ve got mail!
In the early days of email when it was a novelty to receive a new email in your inbox, it was (in my opinion!) exciting to hear this notification. Fast forward from the 90s and many of us are inundated with emails in both our personal email box and the one we use at work. The thought of every email pinging a message now would be too much.
Within Bluesky there is an option to turn on a variety of notifcations and again this is personal choice. The good news is there are a variety of options allowing you to taylor these to your personal preference. For example if there are people or organisations you follow and don’t want to miss their posts, then you can set a notification just for the accounts you choose.
Bluesky have made these updates to notifications:
Activity Notifications: Opt-in to receive push notifications from specific accounts.
Enhanced Notification Settings: Controls to fine tune which notifications you receive. For example receive notifications when someone likes or reposts your posts.
Activity Notifications
This lets you receive push and in-app notifications directly from specific accounts. To enable these new notifications:
Navigate to the profile you want to get notifcations about.
Look for the bell icon: If they have this feature enabled, you’ll see a small bell icon next to the ‘Follow’ button.
Tap the bell: Press it, and you’ll be able to enable notifications specifically for their new posts, and optionally, even their replies.
You can easily opt in to manage the list of people you’re receiving “Activity Notifications” from at any time by going to Settings > Notifications > Activity Notifications.
Enhanced Notification Settings
You can now choose to receive notifications from:
Everyone: Stay in the loop with all interactions.
People you follow: Filter out the noise and focus on your close connections.
No One: For when you need a moment of peace and quiet.
Here are the notification types you can now customize:
Replies: Control who can notify you when they reply to your posts.
Mentions: Decide when you’re pinged for a mention.
Quotes: Manage notifications for posts that quote yours.
Likes: Get notified when someone likes your posts.
Reposts: See when your posts are reposted.
New followers: Keep track of your growing audience.
Likes of your reposts: Get feedback on the content you curate.
Reposts of your reposts: See how far your shared content travels.
To enable these new notifications:
Go to Settings > Notifications to fine-tune your preferences.
You can also enable and disable whether you receive push notifications for each of these categories, giving you even more granular control.
As students return to university many will be looking to apply for either industry placements or graduate roles. For second year students a placement is usually an opportunity to take a year out before the final year of their degree to work for an organisation to gain valuable experience. They are also known as a sandwich year or year in industry. For final year students there may be graduate training schemes where employers are specifically looking to recruit university students.
A report commissioned by University Alliance, CBI Economics (2024) conducted a survey of 252 UK employers across all business sectors, sizes and regions. This found that the most important factors in determining graduate success on the jobs market are:
Enthusiasm for the role they apply for (important to 68% of employers)
Transferrable skills such as communication (important to 55% of employers)
Graduates with degrees that include vocational experience as part of their course (such as internships, placement years or employer-informed projects at university) were deemed to have substantially better performance throughout the recruitment process. 85% of employers believed vocational experience enhanced performance at interview.
Professionalism and online presence
Having a professional online presence is crucial. This means taking time to ensure old social media profiles that are no longer used are deleted. Being aware that any search engine can pull out public posts on social media channels.
What is a Professional Online Presence?
Simply put, this is the collective existence online of any individual (or organisation). This may be as a result of having a presence on a website, social networking site or other digital space; having a profile within that space; or interacting with the online presence of others.
A professional online presence refers one’s online existence in a professional context, and also gives consideration to conducting oneself professionally within any online space. Having a negative or improper online personal presence can have a damaging effect on one’s professional reputation and digital identity. (Beckingham, 2019)
What are employers looking for?
Within job adverts there will be a collection of key essential skills you must be able to demonstrate and often desirable skills the employer is looking for. Applicants will need to demonstrate each of these in a CV and/or application form, with concrete examples. It is highly likely applicants will be asked to expand upon these if invited for an interview. Employers may also ask applicants to inlcude a URL link to their LinkedIn profile.
Skills
Skills may be referred to in a variety of ways. For example transferable ‘soft skills’ are also referred to as people skills, human skills, generic skills and baseline skills and ‘hard skills’ as technical skills, discipline skills, specialist skills and practical skills. (Beckingham, 2023b).
The STAR method (National Careers Service, nd) is a useful way to showcase skills and experience on your LinkedIn profile as well on a CV and/or job application forms.
STAR stands for: Situation – the situation you had to deal with Task – the task you were given to do Action – the action you took Result – what happened as a result of your action and what you learned from the experience
It is important to present authentic examples and to explain what you did, how you did it, and why you did it.
An additional R is Reflect. Here you may want to reflect on:
Why has your experience made you want to apply for [add job role]?
Through your experience, what have you learnt about [add industry] and a career in [discipline]?
How will the skills you’ve gained make you a suitable person for [add role]?
A LinkedIn profile is essential for students and all job applicants as it serves as a digital CV and portfolio, can help to build a professional network, increases visibility to recruiters and employers, and provides a platform for finding internships and job opportunities. Staying active on Linkedin provides the opprtunity to showcase skills, engage with industry professionals, make connections and gain advice.
Placement and graduate recruiters may use LinkedIn to search for potential candidates for the roles they seek to fill. Having a polished and detailed profile can help recruiters find the people they are looking for and verify skills and experience candidates inlude in CVs and applications forms.
How to make your LinkedIn profile stand out
Preparation is key and proofreading what you add to your profile (or better still ask a friend to check it too). Writing in the first person is recommended. Complete all of the required sections and add a photo to your profile. This not only helps potential connections identify you with your name, profiles with a photo are regarded as more trustworthy. A good ‘head and shoulders’ photo can easily be captured by a friend on a mobile phone. Ideally have this taken against a plain backdrop – a white wall is ideal. You can also add a background photo that appears at the top of your profile that reflects your interests.
It should go without saying but adding your current and/or completed degree course and work experience is important. Below are some additional sections to focus in on, which will help to make your profile stand out.
Heading and customised URL
Create a catchy headline (the section at the top of your profile) that clearly states who you are and what you are looking for in your career. Edit to say you are looking for a placement or a graduate role. Personalise your public profile’s URL for a more professional appearance.
Skills
Adding skills to your profile can help employers looking for graduates and placement students find you. Yes employers will use the search function in LinkedIn! The detailed information can go in the ‘About’ and ‘Experience’ sections. Make use of the STAR statement approach. There is a also a specific section to add discipline, technical and soft skills you feel you can demonstrate. Be strategic and add the ones you know are relevant to the industry you wish to work in. Over time you will need to revisit this section and add new skills.
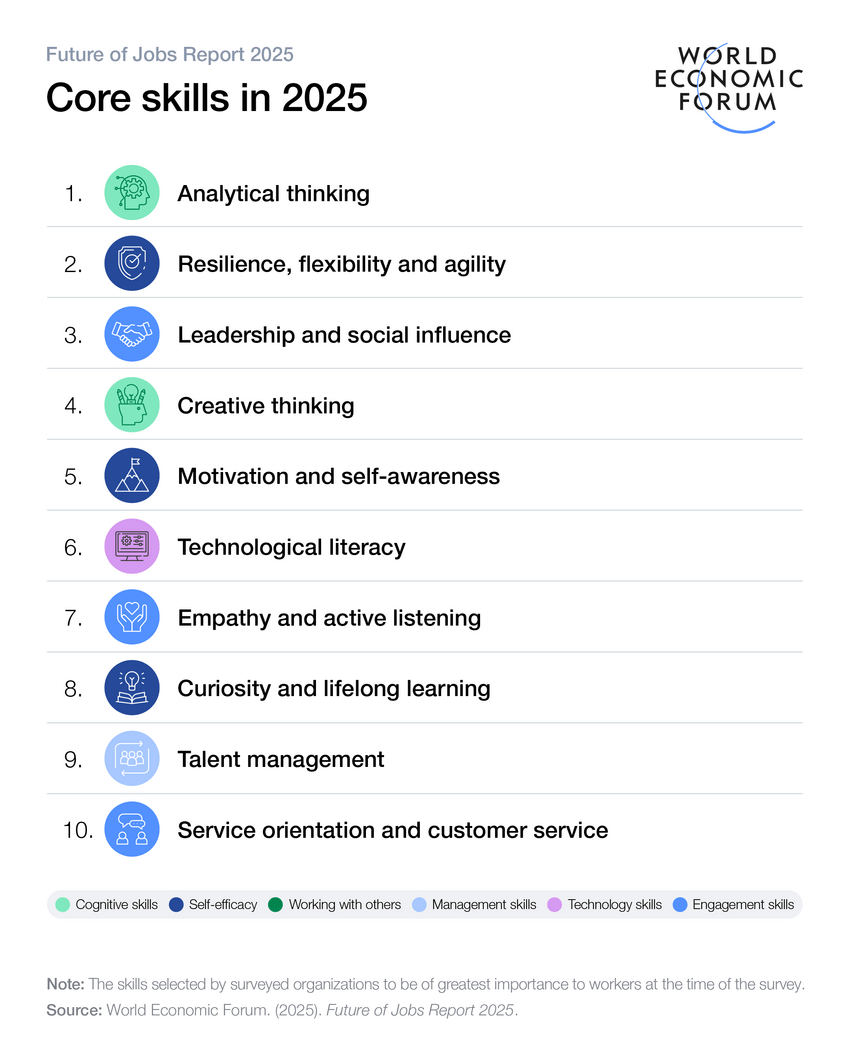
The World Economic Forum (2025) Future Skills Report suggests the core skills in demand are those in the figure below. This is a good starting place to consider your skills, but do take the time to look at a variety of of job adverts in your chosen field to gain an understanding of the skills that are requred.
The report shows that 69% of UK organisations placed resilience, flexibility and agility in the top five skills. Resilience is an important life skill and one to note as you may not get the first job you apply for and you need to keep trying. This is where getting feedback from family, peers or your careers and employability adviser at university, as they can help to check and even make further suggestions to enhance your LinkedIn profile, CV, cover letter and/or application form.
Projects
Add projects you have led or contributed to, and in particular those during work placements, summer internships or employer-informed university projects. Demonstrate the skills you have and are applying to the project.
Volunteering and extracurricular activities
This is a valuable way to make you stand out. Employers are looking for individuals with real-world experience and the development of valuable transferable skills like communication and teamwork. This can complement any part-time work experience you have.
LinkedInrecommendations
If you have work experience, reach out to your colleagues and ask them if they would be happy to give you a recommendation. These will allow connections to validate strengths shown on your profile and endorse your experience. If as a student you engage with roles such as a student rep, student ambassador or student researcher, reach out to your academic lead to see if they would be happy to give you a recomendation for the work you have done.
Make Connections
This may seem obvious, but over time you should aim to develop your connections beyond those you immediately know and work with. For example if you have attended a Careers Fair at university and talked to an employee representing a company you are interested in working for. You could follow this up by sending a personalised connection request saying for example “It was good to meet you at the recent Careers event… Thank you for the advice.”
You can also follow Companies on LinkedIn. This will give you updates on information shared by those organisations. Employers want to find applicants that have done their research and know as much as they can about the organisation. When you follow a company it will also highlight if you are connected to someone who works there. This may be a peer you met at university or a previous job, who could be a great contact to reach out to and find out more about the organisation.
You may be surprised to know that if you DON’T want LinkedIn and its affiliate to use your personal data and content you create on LinkedIn to train generative AI models that create content, the onus is on you to opt out.
“The Data for Generative AI Improvement member setting is set to “on” by default, unless you opt-out by turning it “off.” Turning the setting off means that we (LinkedIn and our affiliates) won’t use the data and content you provided to LinkedIn to train models that generate content going forward. Opting out does not affect training that has already taken place. (LinkedIn, 2025a)
“As with most features on LinkedIn, we collect and use (or process) data about your use of the platform, including personal data. This could include data about your use of generative AI (AI models used to create content) or other AI features, your posts and articles, your saved job application answers and resumes, how frequently you use LinkedIn, your language preference, and any feedback you may have provided to our teams.” (LinkedIn, 2025b)
What data is used by LinkedIn?
LinkedIn’s FAQ page (2025b) states:
We use the following categories of data to train our generative AI models that create content:
Profile Data: Data that members provide in their LinkedIn profile, such as: name, photo, current position, prior work experience, education, location, skills, certifications, licenses , volunteering experiences, publications, patents, endorsements, and recommendations.
GAI Usage Data: Content members input into our GAI features (e.g., prompts, search text, requests, questions)
Jobs-related Data: Responses to screening questions and resumes that members add to their LinkedIn account for ongoing and future use (but are not tied to specific customers or job applications)
Groups Data: Group activity and group messages
Member Content: Member posts, articles, poll responses, contributions and comments (all formats)
Feedback: Feedback and improvement data, which may include support requests from members, thumbs up/down reactions to AI-generated suggestions, reporting of issues with generative AI content, or feedback submitted through our feedback features
Some examples of data we won’t use to train our generative AI models that produce content include:
Private messages (including your InMail and Inbox messages)
Log-in credentials (such as passwords, authentication credentials and tokens, encryption and signing keys)
Payment methods and credit card data
Member-provided salary data or job application data attributable to a specific member
How to opt out
Go to your profile page and click on the small profile picture that appears in the top right corner.
Select ‘Settings and Privacy’
Select ‘Data Privacy’
Select ‘Data for Generative AI improvement’
Turn the green button to off for ‘Use my data for training content creation AI models’
As an educator I enjoy engaging with the scholarship of learning and teaching and often take inspiration from other educators and of course my students. I also like to find new innovative ways to enhance teaching, support students to flourish and confidently evidence their learning. Some of my best ideas don’t ‘arrive‘ while sitting at my desk — they come to me when I’m out on an early morning dog walk. There’s something about the rhythm of walking, the fresh air, and the quiet start to the day that allows ideas to surface: thoughts about teaching, puzzles from recent classes, and new questions I want to explore.
But here’s the challenge: by the time I get home and the rush of the day begins, those carefully-formed ideas can slip away. Sound familiar? If so, this post is for you. Whether your ideas come to you on a dog walk, bike ride, in the garden, or in the shower, here’s how to catch them and turn them into blog posts that can be shared to inspire reflection, dialogue, and scholarship within our teaching communities.
Capturing ideas
Those fleeting ideas can be frustrating to lose. Here are a few simple tricks that might help:
Voice memos Since you’re out walking or gardening, jotting notes might be tricky — but recording a quick voice memo on your phone is easy and captures the idea while it’s fresh.
Pocket notebook If you prefer analogue a tiny notebook in your dog-walking jacket or gardening bag can be a lifesaver. Sometimes writing by hand also reinforces memory.
Trigger words If the full idea feels too big to capture on the spot, jot down just a few trigger words that will jog your memory later.
Mind wandering time post activity Set aside 5–10 minutes after your walk or gardening to sit quietly with a cup of tea and reflect. Often, the ideas will still be there just beneath the surface and can resurface when given space.
Habitual capture routine Make it part of your ritual: Walk, reflect, then immediately capture. The more you do it, the more your brain will start to “trust” that inspiration won’t get lost.
Consider writing a blog post
The next step is sharing your thoughts publicly. One way is to write a blog post. When writing it is ok to use I and we and write in a style that is more informal compared to academic writing for a journal article (though I’d argue these should consider more inclusive language)
A blog post can take different forms. You might want to write an informative ‘how to guide’ or capture a reflective post on your teaching practice, a challenge you’ve experienced and overcome, or a question you are pondering on.
Start with one clear idea Your blog post doesn’t need to be a journal article. Start small: pick one teaching moment, question, or insight. Ask yourself: What made me pause? What could others learn from this?
Use structure to help your reader Subheadings help readers navigate your post. Bullet points (like these!) make key points easy to digest. Short paragraphs keep it readable.
Make it visual Use images — a photo from your walk, a sketch, or a screenshot from a resource. Embed a short video or audio reflection if that feels natural. Sometimes speaking aloud captures energy and tone that text alone might miss.
Add a light touch of scholarship Link to a relevant article, theory, or framework. This adds depth without turning the post into formal writing. Think of it as: “Here’s something I’ve been thinking about — and look, it connects to this interesting piece of research.”
End with a conversation starter Ask a question or invite readers to share their own reflections. Encourage dialogue by ending with questions like ” Has anyone else noticed/experienced this? ” or “What do you do when…?”
Don’t aim for perfection – just share Capture the moment, share your thoughts and iideas in progress, and trust that others will relate. 500–800 words is enough.
Keep an ‘Idea Pot’ Have a running list where you jot down ideas as they come (on a walk or elsewhere!). This can become a goldmine of inspiration for future posts.
In short…
The next time you find yourself inspired mid-walk (or mid-gardening or showering), take a moment to capture the thought — in a voice memo, note, or quick text to yourself. Later, shape it into a short post. Your reflections not only support your own scholarly practice, but could help build a community of reflective readers.
To save yourself time, you can choose to connect your blog to Bluesky and then when you publish a blog post it will automatically create a post in Bluesky for you and post it. You can choose to turn this off prior to publishing a post.
Follow these steps:
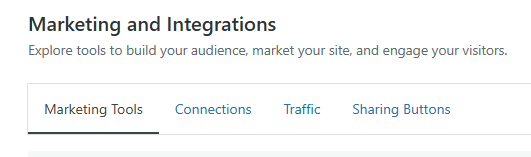
Go Tools > Marketing and Integrations
Then click on the Connections tab at the top of the page.
You will then see this see this window.
Creating an App Password
You will then need to create an App password and can do this by clicking on generate it in Bluesky. This allows you to safely connect your account.
App Passwords
Click Add App Password. Here you will be asked to create a name (make a note of this). You will then receive an app password.
Copy the app password and use this in the WordPress window you have open, adding your Bluesky handle in the first box and the 16 digit app password in the second.
Then click Connect account. You will then see this message. Click Connect.
Connecting Bluesky to your blog
Once you have completed these steps your Blog will be connected to Bluesky.
As previously mentioned when you get to the point of publishing a blog post, you have the option to allow WordPress to autopost to Bluesky, do this manually or choose not to create a Bluesky message.
When I visit a website or blog and find something interesting that I would like to share with others, it is helpful if the site has social media sharing buttons. With the popularity of Bluesky increasing I’ve noticed that not many sites have updated their sharing buttons to include Bluesky. Sharing buttons are usually placed a the bottom of a blog post or web page.
This post shows you how to add a Bluesky sharing button to a WordPress site and what this looks like for the reader when they click on one.
Sharing to Bluesky
If your readers wish to share the post with others, for example Bluesky, instead of manually copying and pasting the title of the post and then going back to capture the link, they can simply click on the Bluesky sharing button and it will do this for them. In WordPress these sharing buttons will appear at the end of the post.
Social media sharing buttons
Below is an example of a previous blog post about Creating themed lists of accounts that you follow on Bluesky. By clicking on the Bluesky button at the end of this blog post, a new window opens in Bluesky containing the title of the blog post and the link.
Note: you do need to be logged into the social media site you have chosen to share the post on.
You can then edit this post if you wish and add any further text before you post.
Example of a the post created in Bluesky
Adding sharing buttonsto your WordPress blog
To add a Bluesky sharing button to your blog, follow these steps.
Visit your blog’s Dashboard
Go to Tools and then Marketing and Integrations
Then click on the Sharing Buttons tab at the top of the page.
Sharing Buttons tab
You can then choose what sharing buttons you would like to display at the end of each post you publish. Once you have chosen the buttons you want, you can reorganise the order in which they will appear.
Click the buttons you would like to add or remove. As you do, you’ll see your chosen buttons in the preview above.
Click the Reorder button to click and drag your chosen buttons to your preferred order.
You can optionally include a More button that displays additional social networks. These buttons will appear after your reader clicks the “More” button that appears next to the buttons you chose in the previous section.
Click Save Changes.
(Note: this is guidance for WordPress.com blog sites, so may differ for other blog platforms.)
Social media sharing buttons
You can choose to edit this collection of social media sharing buttons at any time to add, delete or reorder. Simply click Edit sharing buttons.
Social sharing buttons play a valuable role in increasing the visibility and exposure of your blog posts. By allowing users to easily share your blog posts, these buttons can significantly enhance your blog’s reach and attract new visitors.
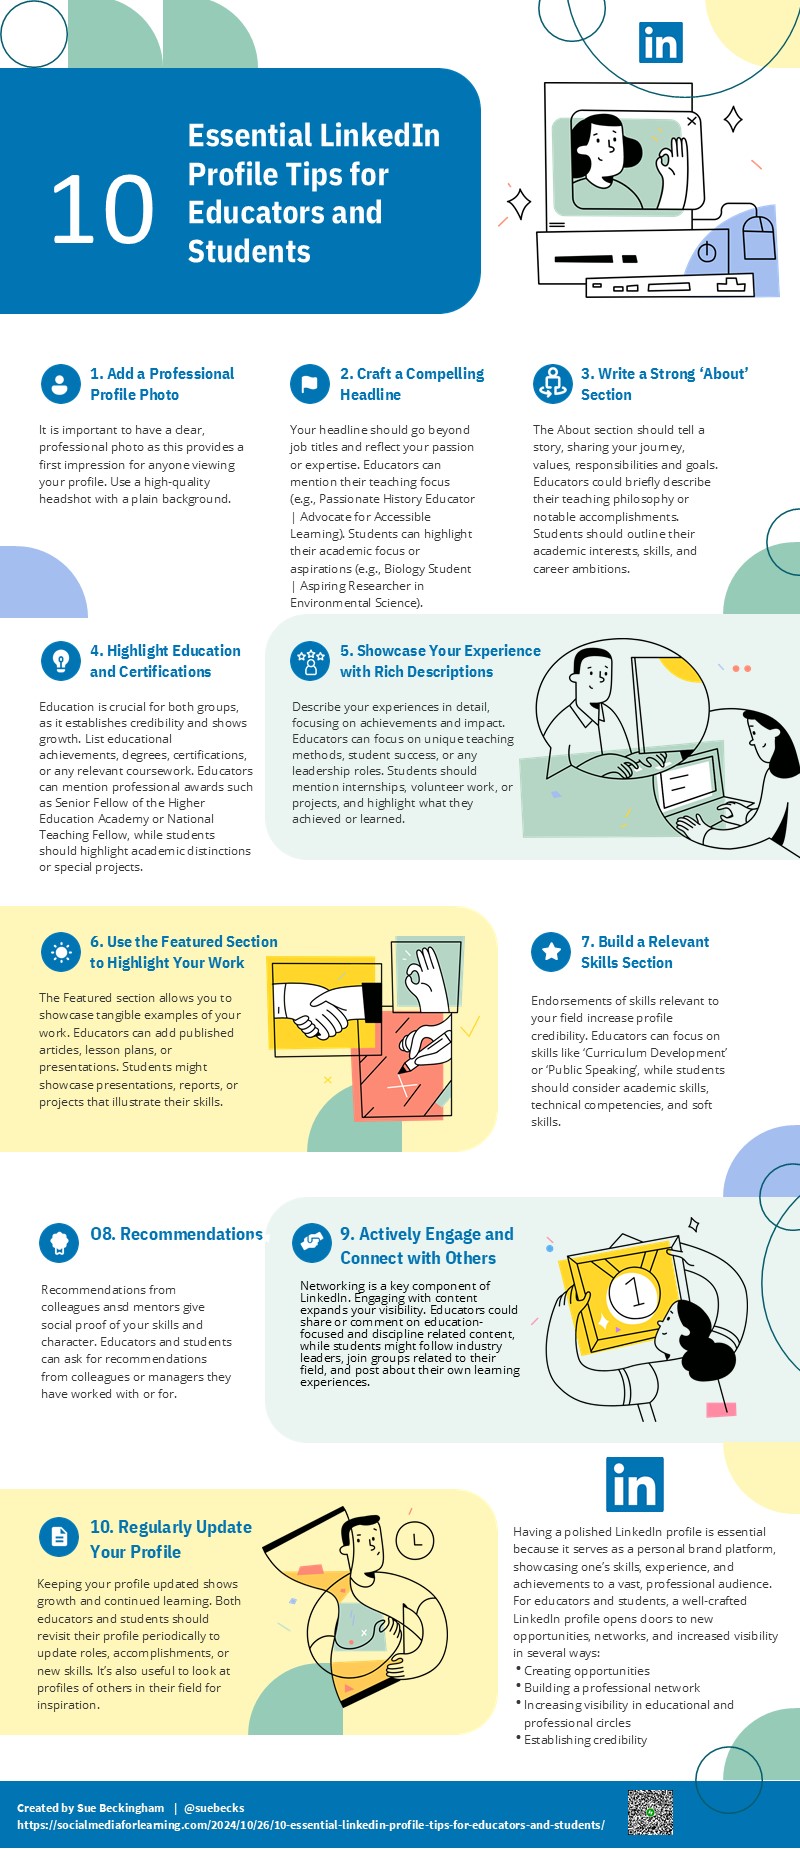
LinkedIn continues to be a popular and useful social professional networking site. In previous posts I have written about the importance of creating a good profile page and updating this periodically to reflect new achievements, projects undertaken that can be shared and any changes to your role. (See 10 essential LinkedIn profile tips)
When you create a LinkedIn account you are allocated a public profile URL that contains your name followed by a random selection of numbers and letters. Below is a LinkedIn profile that has very minimal information on it, and I use this as an example with my students. And yes we discuss that this individual may not have a profile for the same reasons as many others!
Customising your profile URL
Your public profile URL can be edited. It is recommended that you use a variation of your name and/or your professional brand since you’ll share this public profile URL with people, so they can find your LinkedIn profile.
Using the example above, it is likely because this a less common name, that this could be edited to linkedin.com/in/mark-zuckerberg or in the event that name was taken to linkedin.com/in/mark-zuckerberg-CEOatFacebook.
A customised URL will look better when you share it on your CV, in an email signature, on a business card or any other professional material. Customising your LinkedIN URL makes your profile easier for others to identify and connect with you.
Your custom URL can be 3-100 characters long and should not contain spaces, symbols, special characters, or the word LinkedIn. The customizable part of the URL is case insensitive, which means using JohnSmith, johnsmith, or johnSmith will all point to the same profile.
Custom public profile URLs are available on a first come, first serve basis. If your name is not available, this is because someone else has already got this. Be creative by adding your job title, company or a keyword that relates to your role.
You can only have one custom public profile URL at a time.
Customise your URL
Click the Me icon at the top of your LinkedIn homepage.
Click View Profile.
On your profile page, click the Edit icon next to Public profile & URL on the right pane.
Under Edit your custom URL on the right pane, click the Edit icon next to your public profile URL.
Type or edit the last part of your new custom public profile URL in the text box.
Click Save.
Sharing your LinkedIn Profile URL
Add to your email signature
Add to your business card along with a QR code linking to your LinkedIn profile
Some job applications may also ask you for your LinkedIn public profile URL
Add to any social media profiles you are using in a professional context, for example a blog
But remember by doing this you are more likely to get prospective employers and other professionals looking at your profile. It is therefore in your best interests to check your profile regularly and update as appropriate.
Bluesky allows you to curate your feed and create themed lists of accounts you follow. This enables you to view content from just those accounts you add to the lists. You can also choose to view other people’s lists.
Why create themed lists?
Focused Interaction: Engage specifically with people you follow who share particular interests.
Efficient Browsing: Easily find posts related to specific themes or topics.
Enhanced Networking: Build sub-communities within your social network.
View an account listcreated by another user
Go to the profile of an account. If a list has been created then you will see a tab called Lists. Click on this and it will open a new page and any public Lists created. You can then choose to follow any accounts in that list.
Before you start, decide on the themes for your lists. For example: Professional Interests: Higher education educators, specific disciplines or roles, social media for learning, #SoTL. Personal Connections: Friends, family, colleagues. You could also use the Seach tool to find accounts based on keywords or hashtags.
To create a list follow these steps:
Go to your profile menu and look for the option to create a List.
Click on + New.
Assign a name to the list based on the theme (e.g., “Higher Education Educators”).
Give the list a description.
Choose to add an icon or avatar.
To add accounts to your list
Go to the profile of the account.
Click on the three dots at the top right of their profile.
Select add to Lists and then choose the list you want to add them to.
Making the most of your lists
Customise your lists Add or remove accounts as needed to keep the list up-to-date. Change list names to reflect evolving themes.
Use your themed lists View posts from a specific list to stay updated on that theme.
Engage actively Like, repost, and comment on posts from themed lists to foster community growth.
Share your list Go to a list you have a created and click on the three dots. Copy link to list and share in a post or direct message.
Pin your list You can choose to pin your list so you can see this on your home page by selecting Pin to Home.
Creating themed lists of followers on Bluesky is a useful way to enhance your social media experience. By organising your network around specific interests or connections, you can make your interactions more meaningful and effective.
LinkedIn is a valuable networking tool for professionals, educators, and students. It is the world’s largest professional network with more than 1 billion members in more than 200 countries and territories worldwide.
Having a polished LinkedIn profile is essential because it serves as a personal brand platform, showcasing one’s skills, experience, and achievements to a vast, professional audience. For educators and students, a well-crafted LinkedIn profile opens doors to new opportunities, networks, and increased visibility in several ways:
Creating Opportunities: LinkedIn is widely used by recruiters, institutions, and professionals scouting for talent, collaboration, or mentorship opportunities. A polished profile allows educators to connect with institutions looking for experts in specific fields, while students can attract internship offers, project collaborations, and job opportunities directly through LinkedIn.
Building a Professional Network: LinkedIn is uniquely designed to foster meaningful professional relationships. For educators, this can mean connecting with colleagues globally, joining academic discussions, or learning from leaders in the education sector. Students can engage with alumni, mentors, and peers in their field of study, building a strong support network that can offer guidance, referrals, and job leads.
Increasing Visibility in Educational and Professional Circles: An active and polished profile makes educators and students more visible to people searching for specific skills or expertise. With features like skill endorsements, recommendations, and content engagement, LinkedIn profiles gain traction in search results, putting professionals and students on the radar of those interested in their knowledge and potential.
Establishing Credibility: A complete LinkedIn profile, filled with detailed experiences, certifications, and endorsements, builds credibility by providing social proof of one’s expertise and commitment. For educators, this can establish them as authorities in their subjects, while students can position themselves as dedicated and skilled learners ready to contribute meaningfully to their fields.
Tip 1: Start with a Professional Profile Photo It is important to have a clear, professional photo as this provides a first impression for anyone viewing your profile. Use a high-quality headshot with a plain background.
Tip 2: Craft a Compelling Headline Your headline should go beyond job titles and reflect your passion or expertise. Educators can mention their teaching focus (e.g., Passionate History Educator | Advocate for Accessible Learning). Students can highlight their academic focus or aspirations (e.g., Biology Student | Aspiring Researcher in Environmental Science).
Tip 3: Write a Strong ‘About’ Section The About section should tell a story, sharing your journey, values, responsibilities and goals. Educators could briefly describe their teaching philosophy or notable accomplishments. Students should outline their academic interests, skills, and career ambitions.
Tip 4: Highlight Education and Certifications Education is crucial for both groups, as it establishes credibility and shows growth. List educational achievements, degrees, certifications, or any relevant coursework. Educators can mention professional awards such as Senior Fellow of the Higher Education Academy or National Teaching Fellow, while students should highlight academic distinctions or special projects.
Tip 5: Showcase Your Experience with Rich Descriptions Describe your experiences in detail, focusing on achievements and impact. Educators can focus on unique teaching methods, student success, or any leadership roles. Students should mention internships, volunteer work, or projects, and highlight what they achieved or learned.
Tip 6: Use the Featured Section to Highlight Your Work The Featured section allows you to showcase tangible examples of your work. Educators can add published articles, lesson plans, or presentations. Students might showcase presentations, reports, or projects that illustrate their skills.
Tip 7: Build a Relevant Skills Section Endorsements of skills relevant to your field increase profile credibility. Educators can focus on skills like ‘Curriculum Development’ or ‘Public Speaking’, while students should consider academic skills, technical competencies, and soft skills.
Tip 8: Collect Recommendations from Colleagues and Mentors Recommendations give social proof of your skills and character. Educators and students can ask for recommendations from colleagues or managers they have worked with or for.
Tip 9: Actively Engage and Connect with Others Networking is a key component of LinkedIn. Engaging with content expands your visibility. Educators could share or comment on education-focused and discipline related content, while students might follow industry leaders, join groups related to their field, and post about their own learning experiences.
Tip 10: Regularly Update and Optimise Your Profile Keeping your profile updated shows growth and continued learning. Both educators and students should revisit their profile periodically to update roles, accomplishments, or new skills. It’s also useful to look at profiles of others in their field for inspiration.
Further reading
Beckingham, S. (2023). Professionalism and Online Presence. In: Carter, J., O’Grady, M., Rosen, C. (eds) Higher Education Computer Science: A Manual of Practical Approaches 2nd edition. Springer, Cham. https://doi.org/10.1007/978-3-031-29386-3_18
Beckingham, S. (2019) Developing a professional online presence and effective network. In C. Rowell (Ed). Social Media in Higher Education: Case Studies, Reflections and Analysis. Open Book Publishers.https://doi.org/10.11647/OBP.0162.03
Jane Hart has conducted an annual poll on the Top 100 Tools for Learning. The results of the 18th survey were published on 2 September 2024.
The Top 10 tools overall are:
YouTube
ChatGPT
Google Search
Powerpoint
Zoom
Miscrosoft teams
Word
LinkedIn
Canva
Wikipedia
In Jane’s analysis she states that
“Although LinkedIn is in a strong position in 8th place it is down a couple of places this year, and in fact all the other social networks on the list have lost some ground – Instagram (down 6 places) TikTok (down 19 places) Facebook (down 27 places) and X (formerly Twitter) (down 44 places).”
The report categorises the results into 4 key areas: (1) Personal Learning & Productivity (2) Content & Courses (3) Communication & Collaboration and (4) Content Creation & Management. These are listed below and I have highlighted social media tools and the examples of tools placed in this Top 100 Tools.
Personal learning and productivity Pinterest 70th
Content and courses YouTube 1st Vimeo 34th
Communication and collaboration LinkedIn 8th WhatsApp 12th Instagram 19th Facebook 45th TikTok 46th X (Formerly Twitter) 66th
Content creation and management WordPress 25th Medium 93rd
The aim of this blog is to help you explore the different ways you can interact online using social media and the tools to help you do this.
Introducing Social Media
Social Media is an umbrella term for web based and mobile technology that allows the user to produce and share information with others using text and/or media (video, audio, images), who in turn are then able to engage in a interactive dialogue about the content.
About me
Sue is an Associate Professor Learning and Teaching and National Teaching Fellow at Sheffield Hallam University; a Visiting Professor at Arden University and a Visiting Fellow at Edge Hill University. She is also a Principal Fellow of the HEA, a Senior Fellow of the Staff and Educational Development Association, a Certified Management and Business Educator and a Member of the Association of Learning Technology.